|

How to find images for your Military History articles — and what not to do |
By Adam Cuerden
So, I've been working primarily with images on Wikipedia for, like, a decade now. I have a number of sites I regularly use to find images (and, no doubt, a lot of sites I've used before and forgot about). I know how to figure out what copyright tag to use, I know what good procedure is for documenting an image, and I can give some advice on how to modify an image. And I know how to avoid common pitfalls; to whit, upload the original, unmodified image first, then upload your modified version, and provide links between them, so that A. everyone knows what changes were made, and B. if the site you got the image from goes down, we can still find the original image. But more on that later. So much more.
This started out as a fairly simple article and then kept growing and growing; as such I kind of worry I've ended up with a five-article series that all got published at once. It starts off with a list of sources for images, goes into a description of some techniques to get around attempts to keep you from being able to download images, then explains how to judge if an image is out of copyright, explains how to work out what information to include when uploading an image, then the last two sections were my original plan for the article; a description of common pitfalls that come about when people upload images without documenting changes they've made to them. And then I ended by discussing how to choose images for image restoration. That's a lot. (At least I saved the guide to the actual process of restoring images for later. Sort of.) I'd imagine different parts of this article are going to be useful for different people, so feel free to skip around.
Places to get images |
Before we begin, I should probably note that the archives I use are best for events in Europe and North America after about 1700, Australia and New Zealand after 1800, and then a random selection of earlier periods and the rest of the world depending what's in the archives, though Google Art Project does do something to extend that. But it's just a lot easier to research if you at least know the alphabet in question, so there's going to be some major gaps, since, for example, the best sources for Japanese culture and history are likely to be in Japanese, and I can't write a proper search term in kanji, or even be guaranteed to find the button to get to the search box in Japanese.
Luckily, the legacy of colonialism means that large amounts of treasures of the rest of the world have been dragged off to Europe and America. How convenient! Also luckily, I'm writing for a readership who I think I can expect to understand sarcasm.
Sources in the United States of America
America seems particularly good with releasing content; British sources, for example, tend to be locked down, and Canadian sources are generally unwilling to release more than a thumbnail-sized image. So it's often worth checking these sources first.
- The Library of Congress
- Fairly easy to use, though you might need to play with the options on the left after a search, for example, limiting it to images. Good variety, including a lot of random things, like Sergey Prokudin-Gorsky's early colour photographs of Russia and a collection of WWI and WWII propoganda posters. Weird quirk of the site: Always grab the TIFF version given a choice; the JPEGs tend to be much, much smaller. For larger TIFFs, note that this is one of the sites Commons allows direct uploads from if you grab the link to the TIFF (just choose the "Source URL" button from the basic upload form.)
- The Smithsonian Institution
- One of the more convenient ones to use: Just click on the magnifying glass at the top right, put in your search, and click on Collection Images. There are technically some that don't come up in that search, though I really don't know why.
- Naval History and Heritage Command
- The U.S. Navy has a shockingly good site; one wishes that the other service branches did half so good of work on this. Incredible resource.
- The Metropolitan Museum
- Has a lot more things than you'd think it would. For example, a great selection of Timothy H. O'Sullivan's work, as well as other early photographers. Well worth a check.
- National Archives and Records Administration
- Loads of unique content, limited by poor searching and spotty digitisation. Also loads of errors.
- Folger Shakespeare Library
- One of those sources that's hyper-focused, but within that hyper-focus really broad. For example, this 1650 reconstruction of the Temple of Solomon. If there's a chance it's in scope, it's worth checking.
- Digital Public Library of America (DPLA)
- This is kind of your catch-all for American sources not found above. The interface is a little awkward, but it covers a lot of American museums and libraries. Click through to the library, and note that the image shown may be one of several, and that some of the images NOT shown on DPLA searches will actually display if you click through. Weird quirk of the site: A lot of images that don't display on DPLA will show fine if you click through to the original organisation.
There's a lot of sources indexed in DPLA that I actually really like, such as the Minneapolis Institute of Art, but since they are indexed in DPLA, it's probably unnecessary to list them separately.
United Kingdom
The United Kingdom tends to be quite locked down, but there are exceptions. I'm sure there's other good ones, but these are ones I find generally very good:
- The National Library of Scotland
- An excellent source for many things. Unsurprisingly, especially good for Scottish and UK content.
- The National Galleries of Scotland
- Surprisingly deep wells of content. These generally need uploaded with a {{ PD-Art}} or {{ PD-Scan}} wrapper template, but weirdly enough, they actually encourage use on Wikipedia, so... there's that. I'll explain wrapper templates below in their own section.
- The Royal Collections Trust
- A bit variable, but when it gives you something good, it's very good. They do falsely claim copyright on a lot of images they in no way have copyright on; use {{ PD-Scan}} or {{ PD-Art}} as a wrapper template for the copyright tag, as explained below.
France
- Gallica (Bibliothèque Nationale de France)
- This is an absolutely incredible and deep source. From the archives of French Newspapers, the collections of the Paris Opera, to 18th century battle illustrations. Uploading files is a little complex; see Commons:Gallica.
Australia
- The Trove
- Indexes so many Australian libraries and museums. An amazing resource. Fairly easy to use once you get used to the slightly weird way of clicking off to the main museum/library/etc. site where you can actually download things.
New Zealand
- Te Papa Tongarewa (Museum of New Zealand)
- Search, click on "Unrestricted use" or "Some Reuse / Creative Commons" in the column on the left, and get great images. Really easy to use.
Norway
- National Library of Norway
- "Bilder" is Norwegian for "Pictures", so if you click on that after a search you'll get the images you're looking for. Other than the language barrier, it's honestly pretty easy.
The Netherlands
- Nationaal Archief
- Easier to search for names, but there's a surprisingly robust collection of celebrity photographs that have been released to the public domain. Weird quirk of the site: Figuring out copyright tags can be a little tough. As they explain elsewhere, if it has a download button, it's free to use, generally because the Nationaal Archief is the copyright holder and released it to the public domain, meaning the {{ CC-zero}} copyright template should be used. That said, I think there's a reason I've restored a few of their images, but generally ones other people have found.
Worldwide
- Google Arts and Culture
- Great selection of images from a load of museums and libraries worldwide, newly scanned. A little hard to extract unless you know the trick: Just go to the page for the artwork, grab the URL, and paste it into https://dezoomify.ophir.dev/
- Flickr
- Kind of old-school nowadays. But if you choose advanced options for a search, you can choose "No copyright restrictions" or "Creative Commons" and you might find something. I mean, the Prime Minister of Ukraine apparently has a Flickr account. so that's cool. If you click on the little down-pointing arrow in the lower right you can download the largest possible size, but don't do this, just use https://flickr2commons.toolforge.org/#/ and it'll do everything for you, all the documentation, easy!
- If it's the Flickr account of a major archive or library, it can be worth looking up the image on the institution's website and seeing if it's available in higher resolution or with more documentation there.
- Just Google it
- Works more often than you'd think. Used to be a lot easier to find higher-resolution copies of images with Google, but nowadays I find I have to use Bing for that. EU lawsuit, I think.
Getting the images when they don't want you to |
There's three main methods you can try:
- Paste the URL into https://dezoomify.ophir.dev/. This will handle most zoomable images quickly and easily.
- Use Firefox, hit Ctrl-I, which gets you into a tool called "Page Info". Go to the "Media" tab, scroll through the list until you find the full-resolution copy of the file. Check the URL address for the image doesn't include something like width=500 - sometimes you can get a bigger copy by changing that to, say, width=10000 and play around from there.
- Beg for help on Commons:Village Pump.
Copyright |
Image copyright probably deserves its own article, but let's at least cover some common cases. Commons requires that an image be out of copyright both in the United States and its country of origin; English Wikipedia only requires it be out of copyright in the United States. Commons:Copyright rules by territory covers the situation for a lot of countries in a complex, over-detailed way. So here's a very simple guide. If it says something's definitely out of copyright, it should always be right; but there are a number of additional cases where things might be out of copyright that it doesn't include.
For works created outside of the United States, and presuming it's not an anonymous work, you'll need to know the year the photographer or creator died. If you can't find it, see if it comes under {{ PD-old-assumed}}, which basically says that if you can't find the date of death, but the work is more than 120 years old [1] and that if it's more than 190 years old [2] since we know the maximum human lifespan, just treat it as fully out of copyright (Use {{ PD-old-70-expired}}. To find the date of death, first of all, I find libraries often misread names from old cabinet cards if they're written in artistic enough of a font, so check whether there's other readings of the text on them. A Google search for, say, "Bogardus photographer" can sometimes lead you directly to the result; Wikidata also has details for a lot of people, with sources, if you can get enough of their name.
Note that copyright only expires at the end of each calendar year. So, if it says below that a country uses, say, Life + 70 years, then if a creator expired exactly 70 years ago today, Life + 70 will expire 1 January next year.
If the image....
- ...is a work of the U.S. Federal government: Use {{
PD-USGov}}
- Exception: if the main focus of the image [3] is a heraldic emblem (badges, medals, unit insignia and such), use {{ PD-USGov-Military-Army-USAIOH}} instead.
- ...has been released under a Creative Commons or similar license by the rights holder: Use whatever it's been released under.
- ...was published in 1928 or before...
- ...and it's a US work: Use {{ PD-US-expired}}.
- ...and the creator died more than 70 years ago: This is generally good to go. The template is {{
PD-old-auto-expired|deathyear=XXXX}} where XXXX is the year the last surviving creator died. Exceptions: There are seven countries with copyright terms longer than life + 70, listed below. See
List of countries' copyright lengths to see which have terms shorter than 70.
- 75 years ago: Guatemala, Honduras
- 80 years ago: Columbia, Equatorial Guinea, Spain
- 95 years ago: Jamaica
- 100 years ago: Mexico.
- The same {{ PD-old-auto-expired|deathyear=XXXX}} applies to these if it's applicable.
- Russia and France have some weird additional rules, which rarely apply. Note that Russian copyright can't be extended past Life+74 years, but France can extend copyright for death in active service. That said, most French images are probably being grabbed from Gallica, and Gallica marks works that are out of copyright.
- ...is by an anonymous creator: If it's a US work, then go back up to "...and it's a US work". Otherwise, as long as you have a good source for it being anonymous (a major library or museum saying it is is usually good enough), then, generally, anything 70 years post publication in Europe (80 for Spain) is fine, and the rest of the world... ask on
Commons:Village pump/Copyright. Here's the list of templates:
- UK: {{tl PD-UK-unkown}}
- Ireland: {{ PD-Ireland-anon}}
- EU: {{ PD-anon-70-EU}}
- Spain: {{ PD-Spain-anon-80}}
- See Commons:Category:PD-anon_license_tags for others, and then read what the text says.
- literally anything published in 1928 or before: If there's still any doubts, anything from 1928 or before can always be uploaded here (not Commons) and labelled {{ PD-US-expired-abroad}}
What kind of other cases are there?
- Works from the United States of America
- For American copyright, just look at the Hirtle chart. And despair! ...Okay, that's not fair, it's actually a really clear guide to navigating United States copyright. But proving things are out of copyright under some of its provisions can be difficult. For example, for specifically United States works between 1929 and 1963, copyright had to be renewed in order to maintain it. If you can prove an image wasn't renewed, then it's fine to use. But check out File:Carmen Miranda in That Night in Rio (1941).jpg#Licensing for the kind of research that has to be done to prove that.
- The simplest additional case is works from 1977 or before published without a copyright notice. You'll need to make sure it wasn't cropped out, you'll need to check the whole work (so the entire issue of a newspaper, or front and back of a postcard), and you'll need to make sure the work unambiguously originates in America. But, if they don't use the proper form, it's out of copyright. This happened all the time, perhaps most famously with Night of the Living Dead.
- Works from everywhere else:
- As I said, literally anything published in 1928 or before can always be uploaded here (not Commons) and labelled {{ PD-US-expired-abroad}}. Since every file has to be out of copyright in the United States to be uploaded here, and I was focusing on the 1928 or before way of checking American copyright, and Life+70 is so common of a requirement for other countries, I didn't list the countries with requirements less than Life+70. As such, there's going to be some additional cases where something I said to upload under {{ PD-US-expired-abroad}} could have been uploaded to Commons if you checked Commons:Copyright rules by territory and went to the appropriate country. That gets confusing though.
- If a work was out of copyright in its home country before the URAA date.... This one's a nightmare. See, the US doesn't use the "rule of the shortest term", wherein if a work was out of copyright in its home country, OR by the terms set out under U.S. law, it would be out of copyright. It just uses U.S. law. Except, not quite: The U.S., for a long time, didn't respect foreign copyright at all, so if you published a work as a British citizen, it'd be instantly free to use and out of copyright in the United States. It brought copyright protection in gradually, but the long story short is, if it was out of copyright in its home country in 1996 (usually, sometimes later), then it's out of copyright in America, otherwise, follow American rules, except the ones about needing to renew copyright... it's complex enough that it'd probably need that full-length article on copyright.
- Statuatory releases: For example, Crown Copyright generally expires worldwide. UK Crown Copyright only lasts 50 years from creation, for example, which puts a lot of UK works about, say, WWII out of copyright. That said, it's weirdly applied, like giving Winston Churchill copyright on recordings of his governmental speeches. Which might not hold up if you challenged it, but, uh... you want to do the lawsuit?
There's also a lot of things that are specific to one country that's hard to cover. For example, any photograph from Japan from before 1957 is out of copyright both there and America, because the copyright term for photographs was only 10 years after creation until 1957. Some countries refuse copyright to "simple photographs"... and then you have to dig into case law to find out what that means. But I hope this section at least gives you a guide to understanding the easier cases.
The "wrapper" templates: {{ PD-Art}} and {{ PD-Scan}} |
If the museum or library claims copyright on a two-dimensional image, but going through the list above says it's out of copyright, then we acknowledge that the hosting site says that, then upload it anyway. (If it's a picture of a statue or other significantly three-dimensional artwork, they have a valid claim.) This is done using a wrapper template.
{{ PD-Scan}} is used when it's a mere scan of the image, the kind of thing you'd get by putting a photograph on a scanner, and clicking the "Scan" button, and then maybe giving it some minor levels tweaks. {{ PD-Art}} is a little more general and a little more restrictive, it's for if, say, someone took a photograph of a painting, where they might have had to adjust things slightly more. If you're not sure, just use {{ PD-Art}}. Note that {{ PD-Scan}} is only on Commons, so if you're uploading on English Wikipedia, always use {{ PD-Art}}.
So, let's say you've worked out from about that the copyright tag should be {{ PD-old-auto-expired|deathyear=1903}}. It's a mere scan of a photograph, so we can use the slightly stronger {{ PD-Scan}} template. So, we just kind of add PD-Scan in front of the other bits of the template, so it becomes: {{ PD-Scan|PD-old-auto-expired|deathyear=1903}}.
Documenting an image |
Commons has a certain number of tools to help you do this. I... tend not to use them. So, let's just look at the basic {{ Information}} template, because you can always use the tools, then go back and edit it to add anything you missed.
- {{Information
- |Description=
- |Source=
- |Date=
- |Author=
- |Permission=
- |other_versions=
- }}
That's the basic information template. There's also {{ Artwork}} and a few others, but they're much harder to use, and some of them have this weird self-checking code for what you put into them that doesn't always work right, and then... Ech. Just... don't, and use {{ Information}} if you value your sanity.
If the image you're uploading is the original file, add {{ Original}} above the information template. This tells people that this is the original file, you should upload any modified versions as their own file. We'll talk about why that's a good thing more in the next section, but, for now, let's cover everything else, using File:David Livingstone by Thomas Annan - Original.jpg as an example. The image source for it is [1].
- Description
- This is where you put most of the information that doesn't fit elsewhere. Ideally you should link to the Wikipedia articles for things described, but that's.... not as easy as I'd like: you have to use the format [[:en:PAGENAME|PAGENAME]], so don't worry too much about it.
- The description for the David Livingstone image is:
"
David Livingstone, 1813 - 1873. Missionary and explorer", a carbon print of a photograph by
Thomas Annan, 36.90 x 30.20 cm. Gift to the National Galleries of Scotland by T & R Annan and Sons, 1930
. Let's go through this, making a rough order that information should appear in. - If an image is heavily modified in a way that's not really trying to respect the original intent, like desaturating it, that's fine to do, but it's better to mention it straight out. So you might begin, "Greyscale version of..." Upload the original version first, though, I explain why below.
- Start with the title of the image, or the subject if the image is untitled: The National Galleries of Scotland names this image as "David Livingstone, 1813 - 1873. Missionary and explorer". Was that it's original title? Probably not; it dates from 1864, after all, but there's no competing titles, so let's use it. We put it in quotes since it's a title; if it didn't have a title assigned, we'd just use David Livingstone (not in quotes).
- If the title doesn't do a good job of explaining the subject of the image, explain it. For example, if the image had been named "The Explorer", we might write "The Explorer", a photograph of David Livingstone. Sometimes, this might be quite long, for example, explaining a battle and where and when in it the photograph was taken. You can include references, and future article writers might thank you if you do.
- Give basic details about the image, as opposed to the subject. By which I mean things like "Oil painting", "charcoal and ink drawing", "daguerrotype" and such; as much as your source gives you This is specifically a carbon print, which is a way of printing a photograph, and, while we don't have to say it's by Thomas Annan here, it doesn't hurt. If we didn't know it was a carbon print, this bit might work to just "A photograph by Thomas Annan", or if the explanation above went long, we might just bluntly list the fact at the end as "Carbon print, 36.90 x 30.20 cm." On which subject...
- If you know the size of the image, give the size. This image is 36.90 x 30.20 cm.
- Anything else? The museum mentions the instrument of gift, this probably isn't very important, but we'll list it here. More important information, though, might be including a transcription of text written on the image, especially if it's written somewhere that it might end up cropped off, or if it's written on the back of the image. Just say what you can.
- That done, the rest is pretty easy.
- Source
- A link to the page you got it from, wikilinked to the name of the museum. This is a good place to put the accession number. Some sites have special templates to make things easier. If you're going to use a site a lot, it's worth getting used to these, such as {{ loc}} for the Library of Congress and {{ Gallica}} for Gallica/Bibliothèque National de France. It's worth checking your link works, though. Future Wikipedians will thank you.
- Date
- Possibly simple, possibly you'll want to include a reference for this where you detail your extensive efforts to narrow down when the image is from. There's bots that'll automatically internationalise the date for you, so don't worry too much.
- Author
- The artist, photographer, etc. If there's a publisher and a creator, the publisher generally gets mentioned in the description instead. Give the years of birth and death if at all possible. A lot of creators have special templates on Commons, in the rough form {{Creator:Thomas Annan}}. It's often worth just trying the name and seeing if a creator template exists.
- Permission
- You can put the copyright template here, or put it under the information template. I don't know why they made there be multiple acceptable formats.
- other_versions
- This is where you link between the different versions of files, because being able to compare images to see what was done to them is important part of documenting your work. I like to do this as a simple list of links, and include the file you're looking at, because a link to the page you're on just shows up as text in bold so it shows you where you are in the file set instantly, and makes clear the connections between them. In this case, there's just the original file, and a JPEG and PNG of the restoration; the PNG is because repeatedly editing a JPEG will degrade the image because JPEGs are lossy, so it's worth including a PNG copy, because then you can go back and fix things if you spot an error later. This can get more complex: Consider File:Thomas Mundy Peterson by William R. Tobias.jpg, where there's good reasons to use the full card: it's a souvenir of an event where Thomas Mundy Peterson was given a medal for being the first African-American to vote under the 15th Amendment, but there's also going to be cases where you'd want a cropped version, and so I provided one and cleaned up the edges a little bit.
Having done that, add the copyright statement below the information template if you haven't put it into Permission - I still don't know why we have two accepted variants for that, and add a few categories if you can. You can then copy all of this for any other versions of the file, making any changes necessary.
So you want to modify the image? |
I don't want you to be afraid to modify an image. This whole section boils down to "Upload a copy of the original image first, upload your changes as a separate file, and link your modified image to the original version." Because, with a little care, and remembering that subtle changes are often better than huge changes (and pretty much always better than autolevels), you can probably make a better copy of the original image for use on Wikipedia. However, it's misleading to present an altered image as an unaltered original, and it's possible to get an image that genuinely looks better, but, for example, blows out some of the whites, so that information is lost that could have been saved while getting it to look just as nice. If you uploaded the original, this "even better" option is still on the table later, but your copy can be used until that version exists.
So, that said, I'm going to talk about a lot of things that can go wrong. But I don't want to discourage you from trying, just encouraging you to use good image editing behaviour.
First, upload the original to Commons. Mark it with {{ Original}} to tell people not to alter it. Make sure that you upload your altered copies as separate images, and link these images to the original image you just uploaded, stating explicitly that this new copy has been modified.
The documentation is important. Look at these two images of SMS von der Tann:


Despite the obvious differences, these both claim to be the same image, an exact upload of the original source. One isn't. The second one is the actual original file from the Library of Congress. Nothing on the file description page for the first one - at least at time of writing - makes it clear that the first one has been modified in any way.
It's not really a problem to do a bad image adjustment if you've given people the tools to consider how you did by showing people what the image looked like before you did anything.
A good rule of thumb is to look at your image, and look at the original. As long as there's an obvious improvement - and not just at thumbnail: we ideally want people to use our articles as sources to help them find resources as well as information - and you've linked to a copy of the original, everything's great.
And for the record, this "Upload the original image" guide applies to:
- Cropping the image
- First of all, this can hide the fact that more of the person's pose and body exists. But even when it's just to remove a frame, this can lead to problems. It's actually shocking how many times I've seen an image credited to "Unknown photographer", when the name of the photographer was literally right there on the image itself before it was cropped.
- Desaturating a sepia image
- I think this often makes a rather good image look like a bad photocopy, but it can work, and a lot of images did exist in both sepia and black and white. But if you're making a decision to change a historical image for artistic reasons, then it's vitally important that you let people know that you've made that decision in the first place. This is one of those changes that's not one that people will presume you made as part of preparing an image so you need to explicitly state that it has been done in the first line or so of the image's description.
- Levels adjustments
- It's pretty easy to geet this wrong, and there's no real way to document your work without having the original image to compare it to.
- "But Adam, can't people just click through to the site and look at the original that way?"
Sites change their layout all the time, and many once-free sites now don't allow download of their originals. There's a few cases where someone's mangled an image, but clearly had access to a copy I wish I could work on - but I can't.
Image restoration |
Some images are better for a first-time restorationist than others. Take the following examples, each of which is the original file that a recentish featured restoration was based on.

My rule of thumb is that a first-time restorationist should have a reasonable shot at completing their restoration. If something is too difficult to restore it's just going to result in frustration.
French battleship Justice
First of all, the work in restoring an image is, to some extent, proportional to the image's size. This image is 10,212 × 8,097 pixels in size. Not a great start to things. While one can, in theory, crop it a bit, it's still going to be quite large, and it might result in a poor image composition.
Secondly, while parts of the image aren't too bad, the left edge of this image is appalling. Here's a before-and-after restoration comparison:
| Before | After |
|---|---|

|

|
That level of damage took me around 10-15 hours of work just for that little bit on the left hand side (I'm not sure I'm not underestimating that time) and that's with me being highly efficient as I've been doing this for years. Admittedly, it's on the left edge, so you could crop a bit, but it's not clear if you could crop enough to actually make things reasonable without the ship ending up way too tightly cropped. Reviewing an image beforehand to check for problem areas is a good first step before considering restoration. This also gives you a chance to try to figure out anything that might be mistaken for damage but isn't, such as portholes that show up as dark spots on the image, but aren't damage unlike those other dark spots.
Percy Grainger
It has cracks on the negative, and the pieces are slightly misaligned. One can use a careful hand with the select tool to realign them, then restore over the cracks, but cracks, lines, and other such things are relatively hard: the "healing brush" tool can be thrown by the change in colour leaving clear signs of where they were, and they often intersect detailed parts of the image that need carefully pattern matched.
William Harvey Carney
Had I not already restored this one, this would be a pretty good choice for a novice restorationist. There's a tiny bit of weird damage in the lower left, which is small enough to be fairly easy to fix, or it could be cropped out with little damage to composition. There's some damage a bit higher up on the left intruding in from the left hand side, but it's over a bit of non-detailed background that doesn't really matter, so whatever you do to fix it it's not going to look terrible. The rest of the damage is pretty much isolated spots, which are easily fixed with even a half-careful use of the healing brush.
Of course, selecting images is the first step. I'll cover how to do the restoration in another article, but, for now:
I use GIMP, the GNU Image Manipulation Program, which is free. For basic damage, I like to use the healing brush tool, with a hardness 100 brush, set to a size just slightly bigger than the spots, (generally not bigger than about 12px wide), selecting as the source of the pattern something as close to the damaged area as possible when the patterns are detailed (it matters a lot less with tiny damage spots on relatively flat areas of colour.
The clone stamp is sometimes needed where there's a hole or large damage and the healing stamp would change the colours too much; for that I like the hardness 75 brush as it helps it blend in.
The dodge and burn tools, at generally very low opacities (2-10%) and like, a hardness 25 brush, can be quite useful for dealing with areas that are lighter or darker than they should be - like fading - but they handle colour somewhat badly if you try to take it too far. Size depends on what you're fixing; a lot of the time the lightened area has a certain width, so you want to try to match that. Other times I want it quite large. Just hit undo if it's not right the first time. This is probably the easiest one of these to get wrong, saving only...
Levels and curves: I find it's better to be a lot more subtle than you'd think. Don't use autolevels; it's generally absolutely terrible. You'll often need to nudge saturation down a little bit after a large change in levels, as the colours can end up very over-saturated.
|

.jpg#Licensing)
- ^ Exceptions for the 120 years old: 125 for works from Guatemala and Honduras; 130 years ago for Columbia, Equatorial Guinea, and Spain; 145 years ago for Jamaica; and 150 years ago for Mexico.
- ^ Exceptions for the 190 years old: 195 for works from Guatemala and Honduras; 200 years ago for Columbia, Equatorial Guinea, and Spain; 215 years ago for Jamaica; and 220 years ago for Mexico,
- ^ Basically, it doesn't matter if there happens to be an emblem on display if it's incidental to the main image. Like if someone's sitting in an office and a plaque is on their desk.
|
How to find images for your Military History articles — and what not to do |
By Adam Cuerden
So, I've been working primarily with images on Wikipedia for, like, a decade now. I have a number of sites I regularly use to find images (and, no doubt, a lot of sites I've used before and forgot about). I know how to figure out what copyright tag to use, I know what good procedure is for documenting an image, and I can give some advice on how to modify an image. And I know how to avoid common pitfalls; to whit, upload the original, unmodified image first, then upload your modified version, and provide links between them, so that A. everyone knows what changes were made, and B. if the site you got the image from goes down, we can still find the original image. But more on that later. So much more.
This started out as a fairly simple article and then kept growing and growing; as such I kind of worry I've ended up with a five-article series that all got published at once. It starts off with a list of sources for images, goes into a description of some techniques to get around attempts to keep you from being able to download images, then explains how to judge if an image is out of copyright, explains how to work out what information to include when uploading an image, then the last two sections were my original plan for the article; a description of common pitfalls that come about when people upload images without documenting changes they've made to them. And then I ended by discussing how to choose images for image restoration. That's a lot. (At least I saved the guide to the actual process of restoring images for later. Sort of.) I'd imagine different parts of this article are going to be useful for different people, so feel free to skip around.
Places to get images |
Before we begin, I should probably note that the archives I use are best for events in Europe and North America after about 1700, Australia and New Zealand after 1800, and then a random selection of earlier periods and the rest of the world depending what's in the archives, though Google Art Project does do something to extend that. But it's just a lot easier to research if you at least know the alphabet in question, so there's going to be some major gaps, since, for example, the best sources for Japanese culture and history are likely to be in Japanese, and I can't write a proper search term in kanji, or even be guaranteed to find the button to get to the search box in Japanese.
Luckily, the legacy of colonialism means that large amounts of treasures of the rest of the world have been dragged off to Europe and America. How convenient! Also luckily, I'm writing for a readership who I think I can expect to understand sarcasm.
Sources in the United States of America
America seems particularly good with releasing content; British sources, for example, tend to be locked down, and Canadian sources are generally unwilling to release more than a thumbnail-sized image. So it's often worth checking these sources first.
- The Library of Congress
- Fairly easy to use, though you might need to play with the options on the left after a search, for example, limiting it to images. Good variety, including a lot of random things, like Sergey Prokudin-Gorsky's early colour photographs of Russia and a collection of WWI and WWII propoganda posters. Weird quirk of the site: Always grab the TIFF version given a choice; the JPEGs tend to be much, much smaller. For larger TIFFs, note that this is one of the sites Commons allows direct uploads from if you grab the link to the TIFF (just choose the "Source URL" button from the basic upload form.)
- The Smithsonian Institution
- One of the more convenient ones to use: Just click on the magnifying glass at the top right, put in your search, and click on Collection Images. There are technically some that don't come up in that search, though I really don't know why.
- Naval History and Heritage Command
- The U.S. Navy has a shockingly good site; one wishes that the other service branches did half so good of work on this. Incredible resource.
- The Metropolitan Museum
- Has a lot more things than you'd think it would. For example, a great selection of Timothy H. O'Sullivan's work, as well as other early photographers. Well worth a check.
- National Archives and Records Administration
- Loads of unique content, limited by poor searching and spotty digitisation. Also loads of errors.
- Folger Shakespeare Library
- One of those sources that's hyper-focused, but within that hyper-focus really broad. For example, this 1650 reconstruction of the Temple of Solomon. If there's a chance it's in scope, it's worth checking.
- Digital Public Library of America (DPLA)
- This is kind of your catch-all for American sources not found above. The interface is a little awkward, but it covers a lot of American museums and libraries. Click through to the library, and note that the image shown may be one of several, and that some of the images NOT shown on DPLA searches will actually display if you click through. Weird quirk of the site: A lot of images that don't display on DPLA will show fine if you click through to the original organisation.
There's a lot of sources indexed in DPLA that I actually really like, such as the Minneapolis Institute of Art, but since they are indexed in DPLA, it's probably unnecessary to list them separately.
United Kingdom
The United Kingdom tends to be quite locked down, but there are exceptions. I'm sure there's other good ones, but these are ones I find generally very good:
- The National Library of Scotland
- An excellent source for many things. Unsurprisingly, especially good for Scottish and UK content.
- The National Galleries of Scotland
- Surprisingly deep wells of content. These generally need uploaded with a {{ PD-Art}} or {{ PD-Scan}} wrapper template, but weirdly enough, they actually encourage use on Wikipedia, so... there's that. I'll explain wrapper templates below in their own section.
- The Royal Collections Trust
- A bit variable, but when it gives you something good, it's very good. They do falsely claim copyright on a lot of images they in no way have copyright on; use {{ PD-Scan}} or {{ PD-Art}} as a wrapper template for the copyright tag, as explained below.
France
- Gallica (Bibliothèque Nationale de France)
- This is an absolutely incredible and deep source. From the archives of French Newspapers, the collections of the Paris Opera, to 18th century battle illustrations. Uploading files is a little complex; see Commons:Gallica.
Australia
- The Trove
- Indexes so many Australian libraries and museums. An amazing resource. Fairly easy to use once you get used to the slightly weird way of clicking off to the main museum/library/etc. site where you can actually download things.
New Zealand
- Te Papa Tongarewa (Museum of New Zealand)
- Search, click on "Unrestricted use" or "Some Reuse / Creative Commons" in the column on the left, and get great images. Really easy to use.
Norway
- National Library of Norway
- "Bilder" is Norwegian for "Pictures", so if you click on that after a search you'll get the images you're looking for. Other than the language barrier, it's honestly pretty easy.
The Netherlands
- Nationaal Archief
- Easier to search for names, but there's a surprisingly robust collection of celebrity photographs that have been released to the public domain. Weird quirk of the site: Figuring out copyright tags can be a little tough. As they explain elsewhere, if it has a download button, it's free to use, generally because the Nationaal Archief is the copyright holder and released it to the public domain, meaning the {{ CC-zero}} copyright template should be used. That said, I think there's a reason I've restored a few of their images, but generally ones other people have found.
Worldwide
- Google Arts and Culture
- Great selection of images from a load of museums and libraries worldwide, newly scanned. A little hard to extract unless you know the trick: Just go to the page for the artwork, grab the URL, and paste it into https://dezoomify.ophir.dev/
- Flickr
- Kind of old-school nowadays. But if you choose advanced options for a search, you can choose "No copyright restrictions" or "Creative Commons" and you might find something. I mean, the Prime Minister of Ukraine apparently has a Flickr account. so that's cool. If you click on the little down-pointing arrow in the lower right you can download the largest possible size, but don't do this, just use https://flickr2commons.toolforge.org/#/ and it'll do everything for you, all the documentation, easy!
- If it's the Flickr account of a major archive or library, it can be worth looking up the image on the institution's website and seeing if it's available in higher resolution or with more documentation there.
- Just Google it
- Works more often than you'd think. Used to be a lot easier to find higher-resolution copies of images with Google, but nowadays I find I have to use Bing for that. EU lawsuit, I think.
Getting the images when they don't want you to |
There's three main methods you can try:
- Paste the URL into https://dezoomify.ophir.dev/. This will handle most zoomable images quickly and easily.
- Use Firefox, hit Ctrl-I, which gets you into a tool called "Page Info". Go to the "Media" tab, scroll through the list until you find the full-resolution copy of the file. Check the URL address for the image doesn't include something like width=500 - sometimes you can get a bigger copy by changing that to, say, width=10000 and play around from there.
- Beg for help on Commons:Village Pump.
Copyright |
Image copyright probably deserves its own article, but let's at least cover some common cases. Commons requires that an image be out of copyright both in the United States and its country of origin; English Wikipedia only requires it be out of copyright in the United States. Commons:Copyright rules by territory covers the situation for a lot of countries in a complex, over-detailed way. So here's a very simple guide. If it says something's definitely out of copyright, it should always be right; but there are a number of additional cases where things might be out of copyright that it doesn't include.
For works created outside of the United States, and presuming it's not an anonymous work, you'll need to know the year the photographer or creator died. If you can't find it, see if it comes under {{ PD-old-assumed}}, which basically says that if you can't find the date of death, but the work is more than 120 years old [1] and that if it's more than 190 years old [2] since we know the maximum human lifespan, just treat it as fully out of copyright (Use {{ PD-old-70-expired}}. To find the date of death, first of all, I find libraries often misread names from old cabinet cards if they're written in artistic enough of a font, so check whether there's other readings of the text on them. A Google search for, say, "Bogardus photographer" can sometimes lead you directly to the result; Wikidata also has details for a lot of people, with sources, if you can get enough of their name.
Note that copyright only expires at the end of each calendar year. So, if it says below that a country uses, say, Life + 70 years, then if a creator expired exactly 70 years ago today, Life + 70 will expire 1 January next year.
If the image....
- ...is a work of the U.S. Federal government: Use {{
PD-USGov}}
- Exception: if the main focus of the image [3] is a heraldic emblem (badges, medals, unit insignia and such), use {{ PD-USGov-Military-Army-USAIOH}} instead.
- ...has been released under a Creative Commons or similar license by the rights holder: Use whatever it's been released under.
- ...was published in 1928 or before...
- ...and it's a US work: Use {{ PD-US-expired}}.
- ...and the creator died more than 70 years ago: This is generally good to go. The template is {{
PD-old-auto-expired|deathyear=XXXX}} where XXXX is the year the last surviving creator died. Exceptions: There are seven countries with copyright terms longer than life + 70, listed below. See
List of countries' copyright lengths to see which have terms shorter than 70.
- 75 years ago: Guatemala, Honduras
- 80 years ago: Columbia, Equatorial Guinea, Spain
- 95 years ago: Jamaica
- 100 years ago: Mexico.
- The same {{ PD-old-auto-expired|deathyear=XXXX}} applies to these if it's applicable.
- Russia and France have some weird additional rules, which rarely apply. Note that Russian copyright can't be extended past Life+74 years, but France can extend copyright for death in active service. That said, most French images are probably being grabbed from Gallica, and Gallica marks works that are out of copyright.
- ...is by an anonymous creator: If it's a US work, then go back up to "...and it's a US work". Otherwise, as long as you have a good source for it being anonymous (a major library or museum saying it is is usually good enough), then, generally, anything 70 years post publication in Europe (80 for Spain) is fine, and the rest of the world... ask on
Commons:Village pump/Copyright. Here's the list of templates:
- UK: {{tl PD-UK-unkown}}
- Ireland: {{ PD-Ireland-anon}}
- EU: {{ PD-anon-70-EU}}
- Spain: {{ PD-Spain-anon-80}}
- See Commons:Category:PD-anon_license_tags for others, and then read what the text says.
- literally anything published in 1928 or before: If there's still any doubts, anything from 1928 or before can always be uploaded here (not Commons) and labelled {{ PD-US-expired-abroad}}
What kind of other cases are there?
- Works from the United States of America
- For American copyright, just look at the Hirtle chart. And despair! ...Okay, that's not fair, it's actually a really clear guide to navigating United States copyright. But proving things are out of copyright under some of its provisions can be difficult. For example, for specifically United States works between 1929 and 1963, copyright had to be renewed in order to maintain it. If you can prove an image wasn't renewed, then it's fine to use. But check out File:Carmen Miranda in That Night in Rio (1941).jpg#Licensing for the kind of research that has to be done to prove that.
- The simplest additional case is works from 1977 or before published without a copyright notice. You'll need to make sure it wasn't cropped out, you'll need to check the whole work (so the entire issue of a newspaper, or front and back of a postcard), and you'll need to make sure the work unambiguously originates in America. But, if they don't use the proper form, it's out of copyright. This happened all the time, perhaps most famously with Night of the Living Dead.
- Works from everywhere else:
- As I said, literally anything published in 1928 or before can always be uploaded here (not Commons) and labelled {{ PD-US-expired-abroad}}. Since every file has to be out of copyright in the United States to be uploaded here, and I was focusing on the 1928 or before way of checking American copyright, and Life+70 is so common of a requirement for other countries, I didn't list the countries with requirements less than Life+70. As such, there's going to be some additional cases where something I said to upload under {{ PD-US-expired-abroad}} could have been uploaded to Commons if you checked Commons:Copyright rules by territory and went to the appropriate country. That gets confusing though.
- If a work was out of copyright in its home country before the URAA date.... This one's a nightmare. See, the US doesn't use the "rule of the shortest term", wherein if a work was out of copyright in its home country, OR by the terms set out under U.S. law, it would be out of copyright. It just uses U.S. law. Except, not quite: The U.S., for a long time, didn't respect foreign copyright at all, so if you published a work as a British citizen, it'd be instantly free to use and out of copyright in the United States. It brought copyright protection in gradually, but the long story short is, if it was out of copyright in its home country in 1996 (usually, sometimes later), then it's out of copyright in America, otherwise, follow American rules, except the ones about needing to renew copyright... it's complex enough that it'd probably need that full-length article on copyright.
- Statuatory releases: For example, Crown Copyright generally expires worldwide. UK Crown Copyright only lasts 50 years from creation, for example, which puts a lot of UK works about, say, WWII out of copyright. That said, it's weirdly applied, like giving Winston Churchill copyright on recordings of his governmental speeches. Which might not hold up if you challenged it, but, uh... you want to do the lawsuit?
There's also a lot of things that are specific to one country that's hard to cover. For example, any photograph from Japan from before 1957 is out of copyright both there and America, because the copyright term for photographs was only 10 years after creation until 1957. Some countries refuse copyright to "simple photographs"... and then you have to dig into case law to find out what that means. But I hope this section at least gives you a guide to understanding the easier cases.
The "wrapper" templates: {{ PD-Art}} and {{ PD-Scan}} |
If the museum or library claims copyright on a two-dimensional image, but going through the list above says it's out of copyright, then we acknowledge that the hosting site says that, then upload it anyway. (If it's a picture of a statue or other significantly three-dimensional artwork, they have a valid claim.) This is done using a wrapper template.
{{ PD-Scan}} is used when it's a mere scan of the image, the kind of thing you'd get by putting a photograph on a scanner, and clicking the "Scan" button, and then maybe giving it some minor levels tweaks. {{ PD-Art}} is a little more general and a little more restrictive, it's for if, say, someone took a photograph of a painting, where they might have had to adjust things slightly more. If you're not sure, just use {{ PD-Art}}. Note that {{ PD-Scan}} is only on Commons, so if you're uploading on English Wikipedia, always use {{ PD-Art}}.
So, let's say you've worked out from about that the copyright tag should be {{ PD-old-auto-expired|deathyear=1903}}. It's a mere scan of a photograph, so we can use the slightly stronger {{ PD-Scan}} template. So, we just kind of add PD-Scan in front of the other bits of the template, so it becomes: {{ PD-Scan|PD-old-auto-expired|deathyear=1903}}.
Documenting an image |
Commons has a certain number of tools to help you do this. I... tend not to use them. So, let's just look at the basic {{ Information}} template, because you can always use the tools, then go back and edit it to add anything you missed.
- {{Information
- |Description=
- |Source=
- |Date=
- |Author=
- |Permission=
- |other_versions=
- }}
That's the basic information template. There's also {{ Artwork}} and a few others, but they're much harder to use, and some of them have this weird self-checking code for what you put into them that doesn't always work right, and then... Ech. Just... don't, and use {{ Information}} if you value your sanity.
If the image you're uploading is the original file, add {{ Original}} above the information template. This tells people that this is the original file, you should upload any modified versions as their own file. We'll talk about why that's a good thing more in the next section, but, for now, let's cover everything else, using File:David Livingstone by Thomas Annan - Original.jpg as an example. The image source for it is [1].
- Description
- This is where you put most of the information that doesn't fit elsewhere. Ideally you should link to the Wikipedia articles for things described, but that's.... not as easy as I'd like: you have to use the format [[:en:PAGENAME|PAGENAME]], so don't worry too much about it.
- The description for the David Livingstone image is:
"
David Livingstone, 1813 - 1873. Missionary and explorer", a carbon print of a photograph by
Thomas Annan, 36.90 x 30.20 cm. Gift to the National Galleries of Scotland by T & R Annan and Sons, 1930
. Let's go through this, making a rough order that information should appear in. - If an image is heavily modified in a way that's not really trying to respect the original intent, like desaturating it, that's fine to do, but it's better to mention it straight out. So you might begin, "Greyscale version of..." Upload the original version first, though, I explain why below.
- Start with the title of the image, or the subject if the image is untitled: The National Galleries of Scotland names this image as "David Livingstone, 1813 - 1873. Missionary and explorer". Was that it's original title? Probably not; it dates from 1864, after all, but there's no competing titles, so let's use it. We put it in quotes since it's a title; if it didn't have a title assigned, we'd just use David Livingstone (not in quotes).
- If the title doesn't do a good job of explaining the subject of the image, explain it. For example, if the image had been named "The Explorer", we might write "The Explorer", a photograph of David Livingstone. Sometimes, this might be quite long, for example, explaining a battle and where and when in it the photograph was taken. You can include references, and future article writers might thank you if you do.
- Give basic details about the image, as opposed to the subject. By which I mean things like "Oil painting", "charcoal and ink drawing", "daguerrotype" and such; as much as your source gives you This is specifically a carbon print, which is a way of printing a photograph, and, while we don't have to say it's by Thomas Annan here, it doesn't hurt. If we didn't know it was a carbon print, this bit might work to just "A photograph by Thomas Annan", or if the explanation above went long, we might just bluntly list the fact at the end as "Carbon print, 36.90 x 30.20 cm." On which subject...
- If you know the size of the image, give the size. This image is 36.90 x 30.20 cm.
- Anything else? The museum mentions the instrument of gift, this probably isn't very important, but we'll list it here. More important information, though, might be including a transcription of text written on the image, especially if it's written somewhere that it might end up cropped off, or if it's written on the back of the image. Just say what you can.
- That done, the rest is pretty easy.
- Source
- A link to the page you got it from, wikilinked to the name of the museum. This is a good place to put the accession number. Some sites have special templates to make things easier. If you're going to use a site a lot, it's worth getting used to these, such as {{ loc}} for the Library of Congress and {{ Gallica}} for Gallica/Bibliothèque National de France. It's worth checking your link works, though. Future Wikipedians will thank you.
- Date
- Possibly simple, possibly you'll want to include a reference for this where you detail your extensive efforts to narrow down when the image is from. There's bots that'll automatically internationalise the date for you, so don't worry too much.
- Author
- The artist, photographer, etc. If there's a publisher and a creator, the publisher generally gets mentioned in the description instead. Give the years of birth and death if at all possible. A lot of creators have special templates on Commons, in the rough form {{Creator:Thomas Annan}}. It's often worth just trying the name and seeing if a creator template exists.
- Permission
- You can put the copyright template here, or put it under the information template. I don't know why they made there be multiple acceptable formats.
- other_versions
- This is where you link between the different versions of files, because being able to compare images to see what was done to them is important part of documenting your work. I like to do this as a simple list of links, and include the file you're looking at, because a link to the page you're on just shows up as text in bold so it shows you where you are in the file set instantly, and makes clear the connections between them. In this case, there's just the original file, and a JPEG and PNG of the restoration; the PNG is because repeatedly editing a JPEG will degrade the image because JPEGs are lossy, so it's worth including a PNG copy, because then you can go back and fix things if you spot an error later. This can get more complex: Consider File:Thomas Mundy Peterson by William R. Tobias.jpg, where there's good reasons to use the full card: it's a souvenir of an event where Thomas Mundy Peterson was given a medal for being the first African-American to vote under the 15th Amendment, but there's also going to be cases where you'd want a cropped version, and so I provided one and cleaned up the edges a little bit.
Having done that, add the copyright statement below the information template if you haven't put it into Permission - I still don't know why we have two accepted variants for that, and add a few categories if you can. You can then copy all of this for any other versions of the file, making any changes necessary.
So you want to modify the image? |
I don't want you to be afraid to modify an image. This whole section boils down to "Upload a copy of the original image first, upload your changes as a separate file, and link your modified image to the original version." Because, with a little care, and remembering that subtle changes are often better than huge changes (and pretty much always better than autolevels), you can probably make a better copy of the original image for use on Wikipedia. However, it's misleading to present an altered image as an unaltered original, and it's possible to get an image that genuinely looks better, but, for example, blows out some of the whites, so that information is lost that could have been saved while getting it to look just as nice. If you uploaded the original, this "even better" option is still on the table later, but your copy can be used until that version exists.
So, that said, I'm going to talk about a lot of things that can go wrong. But I don't want to discourage you from trying, just encouraging you to use good image editing behaviour.
First, upload the original to Commons. Mark it with {{ Original}} to tell people not to alter it. Make sure that you upload your altered copies as separate images, and link these images to the original image you just uploaded, stating explicitly that this new copy has been modified.
The documentation is important. Look at these two images of SMS von der Tann:
Despite the obvious differences, these both claim to be the same image, an exact upload of the original source. One isn't. The second one is the actual original file from the Library of Congress. Nothing on the file description page for the first one - at least at time of writing - makes it clear that the first one has been modified in any way.
It's not really a problem to do a bad image adjustment if you've given people the tools to consider how you did by showing people what the image looked like before you did anything.
A good rule of thumb is to look at your image, and look at the original. As long as there's an obvious improvement - and not just at thumbnail: we ideally want people to use our articles as sources to help them find resources as well as information - and you've linked to a copy of the original, everything's great.
And for the record, this "Upload the original image" guide applies to:
- Cropping the image
- First of all, this can hide the fact that more of the person's pose and body exists. But even when it's just to remove a frame, this can lead to problems. It's actually shocking how many times I've seen an image credited to "Unknown photographer", when the name of the photographer was literally right there on the image itself before it was cropped.
- Desaturating a sepia image
- I think this often makes a rather good image look like a bad photocopy, but it can work, and a lot of images did exist in both sepia and black and white. But if you're making a decision to change a historical image for artistic reasons, then it's vitally important that you let people know that you've made that decision in the first place. This is one of those changes that's not one that people will presume you made as part of preparing an image so you need to explicitly state that it has been done in the first line or so of the image's description.
- Levels adjustments
- It's pretty easy to geet this wrong, and there's no real way to document your work without having the original image to compare it to.
- "But Adam, can't people just click through to the site and look at the original that way?"
Sites change their layout all the time, and many once-free sites now don't allow download of their originals. There's a few cases where someone's mangled an image, but clearly had access to a copy I wish I could work on - but I can't.
Image restoration |
Some images are better for a first-time restorationist than others. Take the following examples, each of which is the original file that a recentish featured restoration was based on.
My rule of thumb is that a first-time restorationist should have a reasonable shot at completing their restoration. If something is too difficult to restore it's just going to result in frustration.
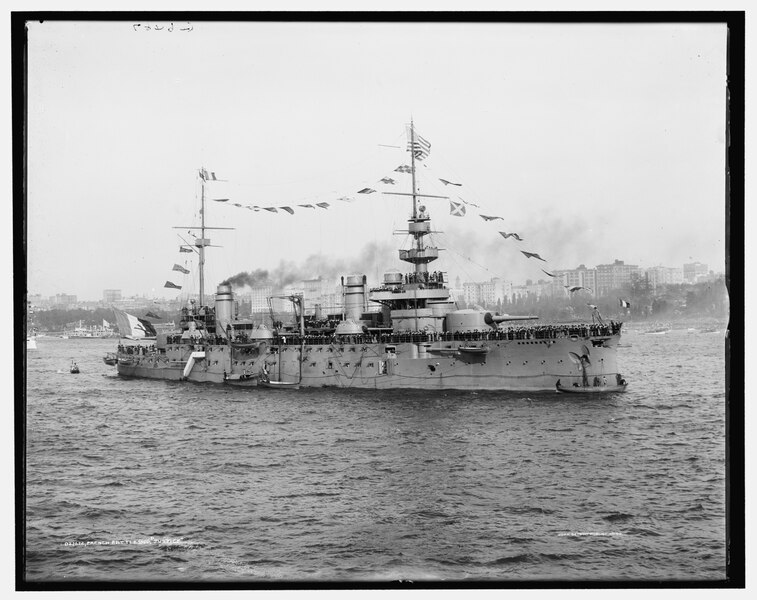
French battleship Justice
First of all, the work in restoring an image is, to some extent, proportional to the image's size. This image is 10,212 × 8,097 pixels in size. Not a great start to things. While one can, in theory, crop it a bit, it's still going to be quite large, and it might result in a poor image composition.
Secondly, while parts of the image aren't too bad, the left edge of this image is appalling. Here's a before-and-after restoration comparison:
| Before | After |
|---|---|
|
|
|
That level of damage took me around 10-15 hours of work just for that little bit on the left hand side (I'm not sure I'm not underestimating that time) and that's with me being highly efficient as I've been doing this for years. Admittedly, it's on the left edge, so you could crop a bit, but it's not clear if you could crop enough to actually make things reasonable without the ship ending up way too tightly cropped. Reviewing an image beforehand to check for problem areas is a good first step before considering restoration. This also gives you a chance to try to figure out anything that might be mistaken for damage but isn't, such as portholes that show up as dark spots on the image, but aren't damage unlike those other dark spots.
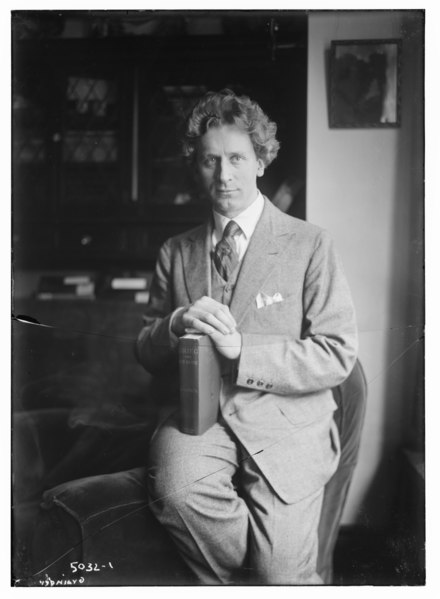
Percy Grainger
It has cracks on the negative, and the pieces are slightly misaligned. One can use a careful hand with the select tool to realign them, then restore over the cracks, but cracks, lines, and other such things are relatively hard: the "healing brush" tool can be thrown by the change in colour leaving clear signs of where they were, and they often intersect detailed parts of the image that need carefully pattern matched.
William Harvey Carney
Had I not already restored this one, this would be a pretty good choice for a novice restorationist. There's a tiny bit of weird damage in the lower left, which is small enough to be fairly easy to fix, or it could be cropped out with little damage to composition. There's some damage a bit higher up on the left intruding in from the left hand side, but it's over a bit of non-detailed background that doesn't really matter, so whatever you do to fix it it's not going to look terrible. The rest of the damage is pretty much isolated spots, which are easily fixed with even a half-careful use of the healing brush.
Of course, selecting images is the first step. I'll cover how to do the restoration in another article, but, for now:
I use GIMP, the GNU Image Manipulation Program, which is free. For basic damage, I like to use the healing brush tool, with a hardness 100 brush, set to a size just slightly bigger than the spots, (generally not bigger than about 12px wide), selecting as the source of the pattern something as close to the damaged area as possible when the patterns are detailed (it matters a lot less with tiny damage spots on relatively flat areas of colour.
The clone stamp is sometimes needed where there's a hole or large damage and the healing stamp would change the colours too much; for that I like the hardness 75 brush as it helps it blend in.
The dodge and burn tools, at generally very low opacities (2-10%) and like, a hardness 25 brush, can be quite useful for dealing with areas that are lighter or darker than they should be - like fading - but they handle colour somewhat badly if you try to take it too far. Size depends on what you're fixing; a lot of the time the lightened area has a certain width, so you want to try to match that. Other times I want it quite large. Just hit undo if it's not right the first time. This is probably the easiest one of these to get wrong, saving only...
Levels and curves: I find it's better to be a lot more subtle than you'd think. Don't use autolevels; it's generally absolutely terrible. You'll often need to nudge saturation down a little bit after a large change in levels, as the colours can end up very over-saturated.
|
- ^ Exceptions for the 120 years old: 125 for works from Guatemala and Honduras; 130 years ago for Columbia, Equatorial Guinea, and Spain; 145 years ago for Jamaica; and 150 years ago for Mexico.
- ^ Exceptions for the 190 years old: 195 for works from Guatemala and Honduras; 200 years ago for Columbia, Equatorial Guinea, and Spain; 215 years ago for Jamaica; and 220 years ago for Mexico,
- ^ Basically, it doesn't matter if there happens to be an emblem on display if it's incidental to the main image. Like if someone's sitting in an office and a plaque is on their desk.