

Image restoration is as close as you can come to owning a time machine. As I write this I'm also in another window staring into Admiral Farragut's eyes. This was the man who said Damn the torpedoes, full speed ahead! Sometime since the United States Civil War years his portrait decomposed and put a line across his left eyebrow. It distorted his right eyelid and added spots to his left iris. I'm getting rid of that mess because the expression behind it is fascinating: calm and fierce at the same time. It's possible nobody has seen these eyes so clearly in over a century.
Image restoration has the potential to reach more people more quickly than any other type of Wikimedia volunteer contribution. Within a month after earning featured picture recognition on Commons, captions for images I've worked on have been translated into as many as fourteen languages. It feels really special to see that much appreciation. Overall this isn't as hard as it may seem. I wish more people were doing this, so if you're interested this page is written for you.
Maybe you'd to pick up a few featured credits; that's fine. We don't all have to be wordsmiths. The thing that matters most for restoration work is a brain that's wired to think visually. Don't worry too much about technical matters at the outset. If you're right for this you'll pick up what you need to know. Go ahead and dabble. If it feels like meditation - a wonderful place away from disputes and edit wars - then read on.
The first thing you'll need is a clean and well-calibrated monitor. Make sure the adjustments are correct and remove any dust or smudges from the screen. Also control the nearby lighting to eliminate glare. These factors really do make a difference when you're restoring images, and addressing them in advance will save time and eye strain.
Next thing you'll need are some images. Over at User:Durova/Landmark images there are plenty waiting for attention. It's an open workshop so feel free to pick some up for restoration. The page also contains useful links to off-wiki resources for more images. If you strike out on your own, be sure to read the featured picture criteria in advance, as well as WP:COPYRIGHT. I've found on average that fewer than 1 in 1000 freely licensed images is worth a second look. The hidden gems are out there, though, and it's a joy to find them.
-
 San Francisco, 1851 daguerrotype.
 -
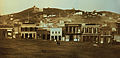 A restoration.
 -
 The United States Capitol, 1846. Original architectural design shortly before construction of new dome.
 -
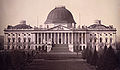 The 1846 capitol, restored.


If you're going to restore images, quality imaging software such as Photoshop is essential (there are other good ones too, but that's what I happen to use). The first thing to address is any rotation or cropping that needs to be done. Generally I crop when an older print is too damaged near the border to be restored, and the area lost contains minimal information.
I spend most of my time viewing the file at 300% to 600% fixing dust, scratches, fibers, and other artifacts with the healing brush tool. I'll make two or three passes through an area, first clearing the most obvious problems and distinguishing artifacts from image details, then returning at higher magnification to address problems that occur near border details. I'll work as large as 18 pixels for the sky and as small as one or two pixels for detail areas. Occasionally when an area is heavily damaged I supplement that with the clone stamp tool from a similar area nearby, then blend it in with the healing brush.
After that I may adjust the histogram (the levels). Although I'm not keen on color correction or filters, sometimes it's worthwhile to use the magnetic lasso and select the sky for denoising, or to select a particular area for sharpening.
| A Soviet " unperson" vanishes: commissar Nikolai Yezhov retouched after falling from favor and being executed in 1940. |
- Do work from the best source file available. In general, the larger the source file the better it's likely to be. Exceptions might happen based upon the quality of the scanning equipment and other factors. A third or fourth generation JPEG is not going to yield high quality results. If the file is extremely large, downsample to something smaller than 5 megs. 2 megs is usually sufficient for featured picture candidacy.
- Do save the restoration under a separate filename. No matter how bad the original source file looks, it's also important and probably contains data lost in restoration. Link back to that original source file and describe the alterations you made. A good description might be Rotated 2°, removed dust and scratches, adjusted histogram.
- Wikipedia isn't Hollywood A subject who has wrinkles, pimples, or other physical flaws should not be glamorized. If the timing and camera angle give the misleading impression that the subject is picking his nose with a radio antenna, leave that in too.
- Don't be a Stalinist The goal is to be true to the original, not to improve upon it. Awkward elements from the original shot should remain in the picture even if they detract from the picture esthetically. Don't excise people, animals, etc. for cosmetic or political reasons.
Some of the strangest thoughts cross one's mind during restoration. Genuinely, I respect all of these images and endeavor to do the best job possible. But I'm the kind of person watched Bowling for Columbine from the gunmount of a Navy warship; irony's my thing. So here are a few of the moments where I had to stop work and get more coffee.
-
 Fixing artifacts on the background figures: I'm making the Nazis look better.
 -
 Adjusting the levels: How black should I make Malcolm X?
 -
 Looking up the artist's biography: This has to be the only G-rated woodcut the man ever did.
 -
 Examining the details: Pass the flask over here, dude.


Image restoration is as close as you can come to owning a time machine. As I write this I'm also in another window staring into Admiral Farragut's eyes. This was the man who said Damn the torpedoes, full speed ahead! Sometime since the United States Civil War years his portrait decomposed and put a line across his left eyebrow. It distorted his right eyelid and added spots to his left iris. I'm getting rid of that mess because the expression behind it is fascinating: calm and fierce at the same time. It's possible nobody has seen these eyes so clearly in over a century.
Image restoration has the potential to reach more people more quickly than any other type of Wikimedia volunteer contribution. Within a month after earning featured picture recognition on Commons, captions for images I've worked on have been translated into as many as fourteen languages. It feels really special to see that much appreciation. Overall this isn't as hard as it may seem. I wish more people were doing this, so if you're interested this page is written for you.
Maybe you'd to pick up a few featured credits; that's fine. We don't all have to be wordsmiths. The thing that matters most for restoration work is a brain that's wired to think visually. Don't worry too much about technical matters at the outset. If you're right for this you'll pick up what you need to know. Go ahead and dabble. If it feels like meditation - a wonderful place away from disputes and edit wars - then read on.
The first thing you'll need is a clean and well-calibrated monitor. Make sure the adjustments are correct and remove any dust or smudges from the screen. Also control the nearby lighting to eliminate glare. These factors really do make a difference when you're restoring images, and addressing them in advance will save time and eye strain.
Next thing you'll need are some images. Over at User:Durova/Landmark images there are plenty waiting for attention. It's an open workshop so feel free to pick some up for restoration. The page also contains useful links to off-wiki resources for more images. If you strike out on your own, be sure to read the featured picture criteria in advance, as well as WP:COPYRIGHT. I've found on average that fewer than 1 in 1000 freely licensed images is worth a second look. The hidden gems are out there, though, and it's a joy to find them.
-
San Francisco, 1851 daguerrotype.
-
A restoration.
-
The United States Capitol, 1846. Original architectural design shortly before construction of new dome.
-
The 1846 capitol, restored.
If you're going to restore images, quality imaging software such as Photoshop is essential (there are other good ones too, but that's what I happen to use). The first thing to address is any rotation or cropping that needs to be done. Generally I crop when an older print is too damaged near the border to be restored, and the area lost contains minimal information.
I spend most of my time viewing the file at 300% to 600% fixing dust, scratches, fibers, and other artifacts with the healing brush tool. I'll make two or three passes through an area, first clearing the most obvious problems and distinguishing artifacts from image details, then returning at higher magnification to address problems that occur near border details. I'll work as large as 18 pixels for the sky and as small as one or two pixels for detail areas. Occasionally when an area is heavily damaged I supplement that with the clone stamp tool from a similar area nearby, then blend it in with the healing brush.
After that I may adjust the histogram (the levels). Although I'm not keen on color correction or filters, sometimes it's worthwhile to use the magnetic lasso and select the sky for denoising, or to select a particular area for sharpening.
| A Soviet " unperson" vanishes: commissar Nikolai Yezhov retouched after falling from favor and being executed in 1940. |
- Do work from the best source file available. In general, the larger the source file the better it's likely to be. Exceptions might happen based upon the quality of the scanning equipment and other factors. A third or fourth generation JPEG is not going to yield high quality results. If the file is extremely large, downsample to something smaller than 5 megs. 2 megs is usually sufficient for featured picture candidacy.
- Do save the restoration under a separate filename. No matter how bad the original source file looks, it's also important and probably contains data lost in restoration. Link back to that original source file and describe the alterations you made. A good description might be Rotated 2°, removed dust and scratches, adjusted histogram.
- Wikipedia isn't Hollywood A subject who has wrinkles, pimples, or other physical flaws should not be glamorized. If the timing and camera angle give the misleading impression that the subject is picking his nose with a radio antenna, leave that in too.
- Don't be a Stalinist The goal is to be true to the original, not to improve upon it. Awkward elements from the original shot should remain in the picture even if they detract from the picture esthetically. Don't excise people, animals, etc. for cosmetic or political reasons.
Some of the strangest thoughts cross one's mind during restoration. Genuinely, I respect all of these images and endeavor to do the best job possible. But I'm the kind of person watched Bowling for Columbine from the gunmount of a Navy warship; irony's my thing. So here are a few of the moments where I had to stop work and get more coffee.
-
Fixing artifacts on the background figures: I'm making the Nazis look better.
-
Adjusting the levels: How black should I make Malcolm X?
-
Looking up the artist's biography: This has to be the only G-rated woodcut the man ever did.
-
Examining the details: Pass the flask over here, dude.